

Introduction
Making portrays as a novice can be both energizing and overwhelming, however with the right thoughts and approach, it turns into a compensating excursion of innovativeness and expertise improvement. This guide means to move fledglings with easy sketch for beginners thoughts that are congenial yet different, taking care of different interests and ability levels. Whether you’re investigating pencil outlines, pen and ink drawings, or trying different things with colors, these thoughts give a beginning stage to release your creative articulation. From basic ordinary items and scenes to digest ideas and character outlines, every thought supports trial and error and development. Set out on this creative excursion with certainty, permitting each sketch to assemble your abilities and light your enthusiasm for drawing. With training and persistence, you’ll find the delight of catching minutes, investigating creative mind, and rejuvenating your thoughts through the craft of portraying.
Material you ought to require when you are a juvenile in depicting
.While starting to depict, having the right materials can basically overhaul your experience and progress as a specialist. Also read Complete Guide to Easy Sketches of Flowers.Here is a manual for key materials you should consider as a fledgling in your easy sketch for beginners:
1. Sketchbook:
A respectable-quality sketchbook is critical in easy sketch for beginners Look for one with destructive-free paper that is adequately thick to manage various media without leaking through. A size around A4 or 9×12 inches is adaptable for both little blueprints and more point-by-point drawings.

2. Pencils:
Put assets into a lot of drawing pencils with evolving hardness (H, HB, B, 2B, etc.). This will allow you to make different line loads and shades in easy sketch for beginners. A mechanical pencil with refillable leads is helpful for definite lines.
3. Erasers:
A worked eraser is fragile and molds to your optimal shape, making it ideal for lifting graphite without hurting paper. A white vinyl eraser is useful for careful destruction and cures in easy sketch for beginners.
4. Sharpener:
A quality pencil sharpener ensures your pencils are, for each situation, sharp for fine nuances to make easy sketch for beginners. Look for one that obliges different pencil assessments and doesn’t waste an extreme measure of lead.
5. Pens and Ink:
If you’re enthused about ink drawing, start with a lot of fine liners or specific pens in various line widths (e.g., 0.1mm, 0.3mm, 0.5mm). Waterproof India ink pens are adaptable and fitting for representing and point-by-point work is best for easy sketch for beginners.
6. Brushes and watercolors:
For those researching watercolor drawing, a lot of watercolor brushes (round and level) and a moderate watercolor range with central tones are crucial. Watercolor pencils are, in like manner, an amazing decision for unmistakable work and blending.
7. Rulers and Drawing Devices:
A direct ruler helps in characterizing straight limits and assessing degrees definitively in your easy sketch for beginners. Other strong gadgets consolidate a compass, a French curve (for twists), and a T-square (for particular drawings).
8. Blending Instruments:
Blending stumps or tortillons is used to blotch and blend graphite or charcoal for smooth eclipsing and points. They help with making easy sketch for beginners with fragile advances and overhauling the genuineness of drawings.
9. Fixative:
A sprinkle fixative is significant for protecting finished draws, hindering blotching, and defending delicate media like charcoal or pastel. Use it in a very well-ventilated district, complying with maker rules to make easy sketch for beginners.
10. Lighting and Workspace:
Ensure your workspace is adequately bright with customary light or a respectable-quality workspace light. A pleasing seat and an ideal, wreck-free surface add to a supportive environment for focused depicting gatherings in your easy sketch for beginners.
11. Reference Materials:
Gather visual references like photographs, things, or pictures that energize you. These references help in practicing discernment capacities and getting sensible nuances in your portrayals of your easy sketch for beginners.
12. Diligence and Practice:
Above all, industriousness and standard practice are earnest. Drawing is an aptitude that improves with consistent effort and experimentation. Don’t hold back the slightest bit to commit mistakes; they’re fundamental for developing experience.
By placing assets into these basic materials and making a supportive workspace, you put yourself in a position for a delightful outing into drawing as a juvenile. Investigate various roads in regards to different systems, research your creativity, and participate in the time spent cultivating your innovative limits.
The most effective method to easily sketch body structure with shapes
Step 1: Essential Shapes and Extents
Start by drawing the fundamental shapes and extents of the body. Utilize straightforward mathematical shapes to address various pieces of the body:
- Head: Begin with an oval or a circle.
- Middle: Draw a square shape or a lengthened oval for the chest region.
- Pelvis: Utilize a more modest square shape or oval underneath the middle.
- Appendages: Address arms and legs with chambers or extended ovals. Use circles to show joints (shoulders, elbows, wrists, hips, knees, and lower legs).

Step 2: Interfacing and refining
Interface and refine the shapes to frame a strong body structure:
- Neck: Define two boundaries, associating the head with the middle.
- Arms and Legs: Associate the round and hollow shapes with lines to make the regular progression of appendages, changing the points at the joints.
- Midriff and Hips: Associate the middle with the pelvis easily, tightening the abdomen if necessary.
- Hands and Feet: Add essential shapes for hands (squares or square shapes) and feet (triangles or lengthened shapes).
Refine the general design by streamlining the associations between shapes; it is right to guarantee the extents and arrangements. This essential sketch serves as the system for adding subtleties and characterizing highlights later.
The most effective method to easily sketch bird structures with shapes
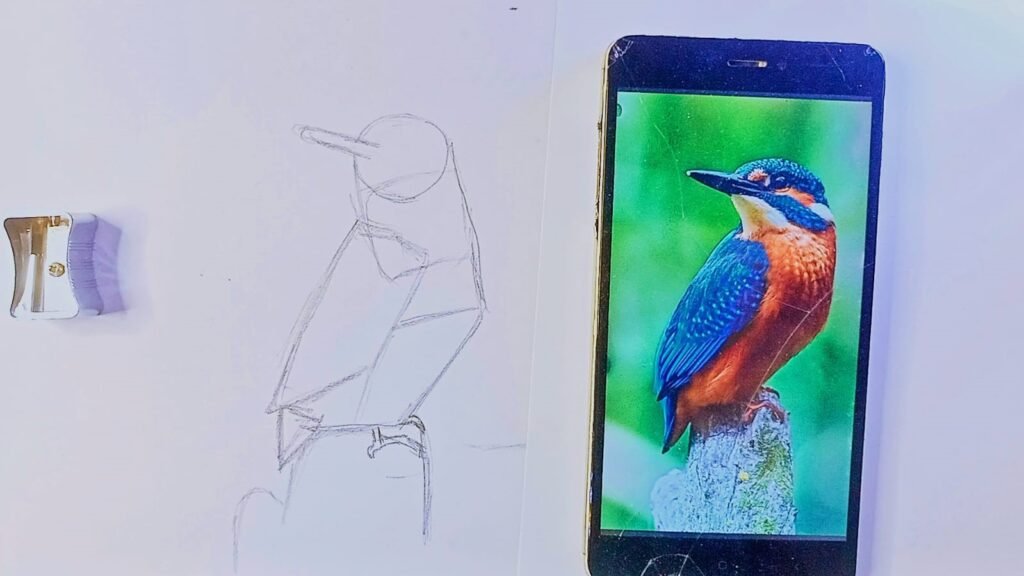
Step 1: Essential Shapes
Begin by recognizing and drawing the fundamental shapes that structure the bird’s body. Most birds can be streamlined into three primary shapes: an oval for the body, a more modest circle or oval for the head, and a triangle for the bill.
- Body: Draw an oval shifted somewhat to match the bird’s stance. This oval will address the bird’s middle and principal mass.
- Head: Draw a more modest circle or oval on top of the bigger body oval. The size and position of this shape depend on the bird species.
- Mouth: Connect a triangle to the more modest circle (head) for the snout. Change the point and size in light of the kind of bird you’re outlining.
Step 2: Adding Subtleties
Refine the essential shapes by adding subtleties to precisely frame the bird’s design.
- Neck and Tail: Interface the head and body with bended lines for the neck. Expand a tightening square shape or a progression of quill-like shapes from the rear of the body oval to frame the tail.
- Wings and Legs: Sketch stretched ovals or bends on the sides of the body for the wings, changing their size and position in light of whether the bird is flying or roosted. For the legs, define straight or somewhat bended boundaries stretching out from the lower part of the body, finishing with more modest ovals or square shapes for the feet.
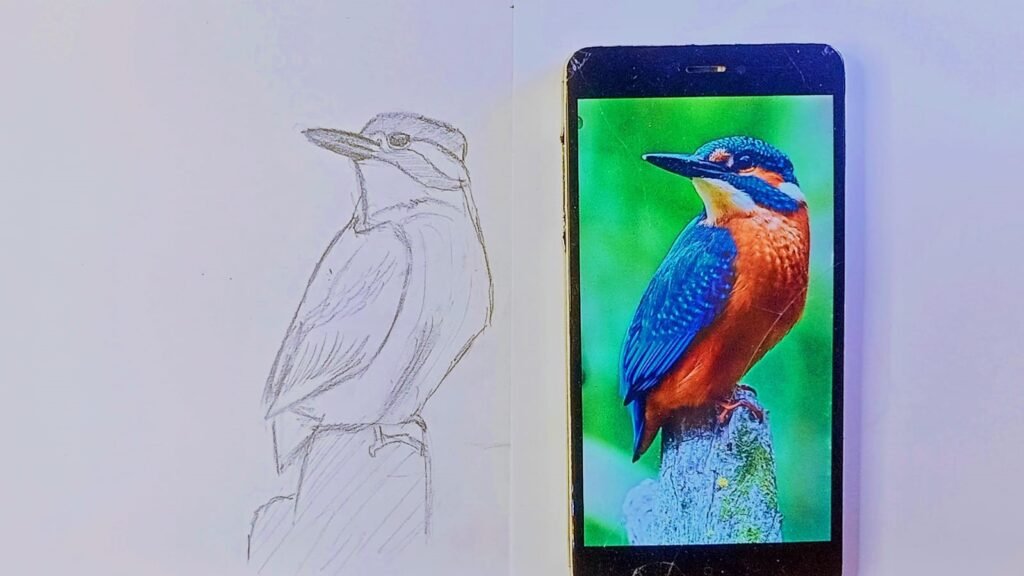
By beginning with essential shapes and progressively refining them, you can undoubtedly draw the construction of birds. This strategy helps in catching the general extent and stance before jumping into complicated subtleties.
The most effective method to easily sketch face structure with shapes
Portraying a face structure utilizing fundamental shapes is a direct cycle that can assist novices with making precise and corresponding representations. Here is a straightforward two-step technique to kick you off:
Step 1: Blueprinting the Fundamental Shapes
Begin by drawing an oval for the head. This shape ought to be marginally more extensive at the top and smaller at the base, looking like an egg. Partition the oval in an upward direction with a light line to check the focal point of the face. Then, at that point, define an even boundary mostly down the oval to demonstrate the eye line. Underneath this, define one more flat boundary somewhere between the eye line and the lower part of the oval for the nose. At long last, add an even line somewhat over the lower part of the oval to check the location of the mouth. These lines will act as guides for putting on facial highlights.
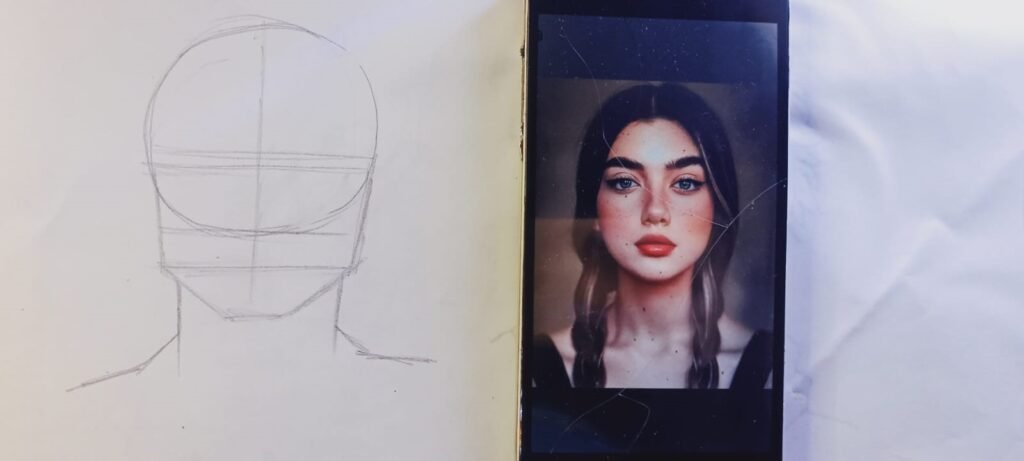
Step 2: Add Facial Elements
With the rules set up, start adding the facial elements. Draw the eyes along the eye line, guaranteeing they are uniformly dispersed on one or the other side of the upward centerline. The space between the eyes ought to be around the width of one eye. Then, draw the nose by adding a straightforward triangle or trapezoid shape to the button line. The lower part of the nose ought to line up with the external edges of the eyes. For the mouth, define a flat boundary on the mouth line, somewhat bended upwards or downwards founded on the articulation, with the edges of the mouth fixing up generally with the focal point of each eye. At long last, sketch the ears between the eye line and nose line, and add the neck reaching out from the lower part of the oval.

By utilizing these essential shapes and rules, you can make a proportional face structure that fills in as an establishment for adding subtleties and refining your sketch.
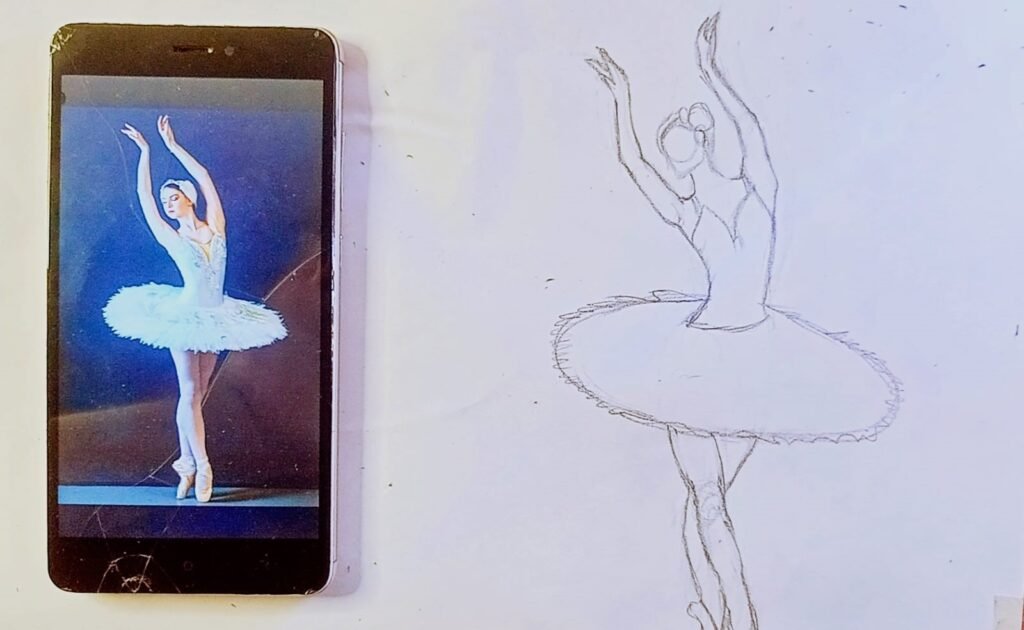
Step-by-step instructions to easily sketch dance presents structures with shapes.
Drawing dance postures can be rearranged by separating the interaction into two fundamental stages: utilizing shapes to frame the design and refining the subtleties.
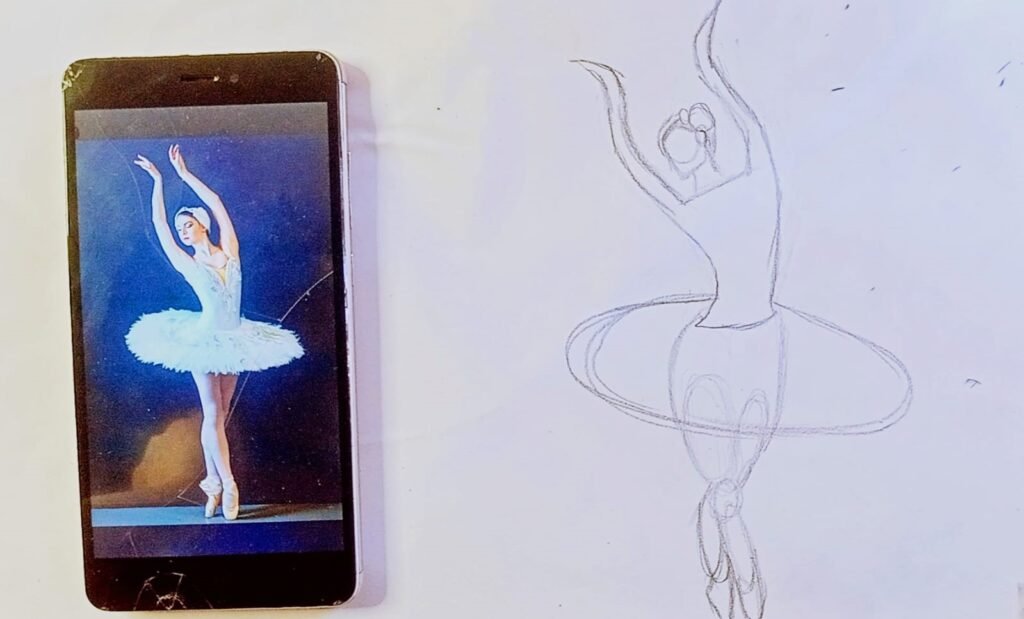
Step 1: Develop the Fundamental Construction with Shapes
Begin by envisioning the artist’s posture and separating it into basic mathematical shapes. Use circles, ovals, square shapes, and lines to address various pieces of the body.
- Head: Draw an oval or circle.
- Middle: Utilize a square shape or oval.
- Arms and Legs: Sketch lines for the appendages, with circles at the joints (shoulders, elbows, hips, knees).
- Hands and Feet: Utilize more modest ovals or square shapes.
For instance, if portraying a ballet performer in an arabesque posture:
Draw a circle for the head.
- Append an oval for the middle, somewhat shifted to show development.
- Expand a line from the middle for the raised leg, adding a little oval for the foot.
- Draw the supporting leg as a line, twisted at the knee, with an oval for the foot.
- Use lines for the arms, expanded smoothly, with little ovals for the hands.
Step 2: Refine the Subtleties and Add Elements
With the fundamental design set up, refine the shapes to add more detail and catch the smoothness of the dance.
- Frame the Body: Smooth the lines, molding the appendages and middle to reflect muscles and bends.
- Add Subtleties: Sketch the hands, feet, and facial elements.
- Demonstrate Development: Utilize streaming lines to show the heading of development, like the bend of a raised arm or the curve of a back.
By beginning with straightforward shapes and steadily adding points of interest, you can undoubtedly draw dynamic dance representations that capture the effortlessness and energy of the artist.
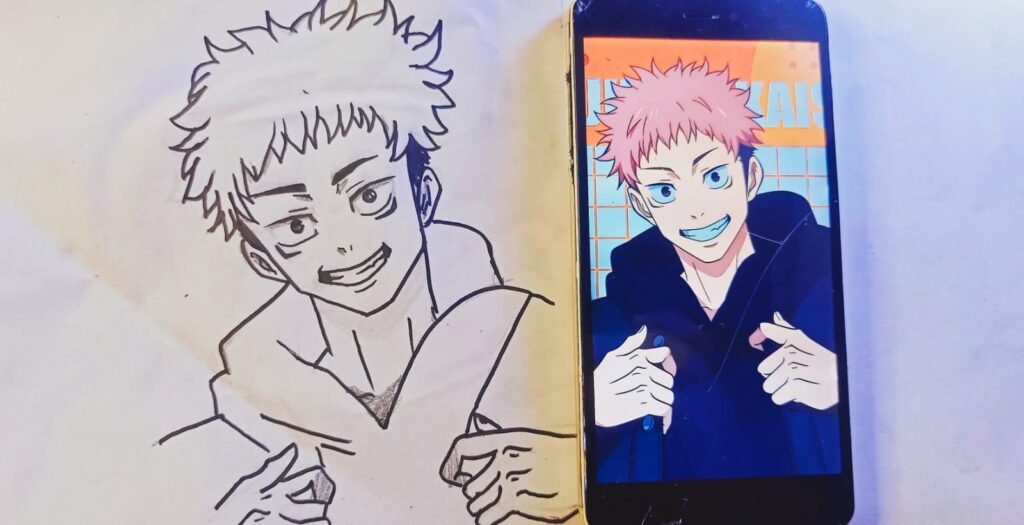
Step by step instructions to easly sketch anime structures with shapes
Step 1: Essential Shapes and Extents
Begin by attracting the essential shapes to lay out the general construction and extent of your anime character. Use circles, ovals, and square shapes to frame the head, middle, and appendages. For the head, draw an oval or circle, marginally pointed at the jaw, for a normal anime look. Partition the head with a vertical and flat line to precisely situate the facial elements. The upward line helps focus the face, while the flat line shows the position of the eyes.
For the middle, utilize a square shape or trapezoid. Add circles for the shoulders and hips. Interface these with lines to address the spine and lay out the act. Sketch basic shapes for the arms and legs utilizing ovals and chambers, trying to keep the extents steady with the head and middle. This step lays the foundation for the person’s fundamental construction and guarantees the right extent.

Step 2: Refining the Elements and Subtleties
With the essential shapes set up, begin refining the elements and adding subtleties. Center around the face first. Draw enormous, expressive eyes along the flat line on the head. Utilize extra lines inside the eyes to demonstrate the situation of students, features, and eyelashes. Add eyebrows, a little nose, and a mouth situated somewhat beneath the focal point of the face.
Then, refine the middle, arms, and legs by adding bends and forms to address muscles and dress. Supplant the basic shapes with additional, characterized lines to frame the body. Add subtleties like hair, attire, and adornments. Keep the lines light and liquid to keep up with the anime style. At last, eradicate the essential shapes and rules to tidy up the sketch, leaving a refined blueprint of your anime character.
Tips for Perfect Basic Sketching
1. Begin with light lines.
While starting your sketch, utilize light, delicate strokes. This considers simple changes and remedies. Light lines assist with illustrating the essential shapes and designs without resolving to subtleties too soon. A gentler pencil, similar to an H or HB, is great for this stage.
2. Utilize essential shapes.
Separate complex subjects into straightforward mathematical shapes like circles, squares, square shapes, and triangles. For instance, use ovals for heads, square shapes for middles, and chambers for appendages. This strategy helps in precisely catching extents and improves on the underlying outlining process.
3. Center around Extents
Focus on the extent of your subject. Use reference points and rules to guarantee that the different components of your sketch are accurately estimated and situated. For human figures, grasping fundamental life structures and extents (e.g., the head-to-body proportion) is urgent.
4. Work from General to Explicit
Begin with wide, general shapes and steadily move to explicit subtleties. Frame the primary structures first, and then refine the shapes. Add subtleties like facial elements, surfaces, and multifaceted lines solely after laying out the general design. This approach guarantees a strong groundwork and prevents losing all sense of direction in subtleties too soon.
5. Keep your hand moving.
Try not to zero in on a lot in one spot. Get your hand across the whole sketch, adding subtleties and refining lines equally. This method keeps up with equilibrium and consistency all through the drawing.
6. Utilize Various Lines
Try different things with various line loads and styles. Thicker lines can accentuate the external edges or significant elements, while more slender lines are ideally suited for subtleties. Shifting line pressure adds profundity and aspect to your sketch, making it more powerful and intriguing.
7. Mind the Light Source
Consider the light source in your sketch to create reasonable overshadowing and features. Figure out where the light is coming from and apply shadows likewise. Use incubating, cross-bringing, or texturing methods to add surface and profundity. This training upgrades the three-dimensionality of your drawing.
8. Practice tolerance and diligence.
Portraying is an expertise that improves with training and tolerance. Try not to rush the cycle. Take as much time as necessary to notice and refine your work. Customary practice creates muscle memory and improves your capacity to precisely catch subtleties.
9. Use references.
Use reference pictures or genuine subjects to direct your outlining. References give significant data about extents, life systems, and subtleties that may be trying to be reviewed from memory. Concentrating on references likewise helps in grasping various surfaces and structures.
10. Audit and reflect
In the wake of finishing your sketch, pause for a minute to survey and ponder it. Recognize regions that need improvement and note what functions admirably. Looking for input from others or contrasting your work with references can give you new bits of knowledge and assist you in developing as a craftsman.
By following these tips, you can further develop your fundamental outlining abilities, establishing serious areas of strength for further developed strategies and complex drawings. Ordinary practice, combined with a careful methodology, will prompt observable advancement over the long haul.
What to Avoid During Basic Sketching
1. Weighty Hand Tension
Try not to press excessively hard with your pencil. Weighty lines can be hard to eradicate and may harm the paper, committing errors while trying to address them. All things being equal, utilize light, delicate strokes, particularly in the underlying phases of your sketch, to consider simple changes and clean lines.
2. Overthinking subtleties too soon
Hopping into subtleties too early can disturb the flow and equilibrium of your sketch. Center around laying out the essential shapes and generally structure prior to adding unpredictable subtleties. Getting impeded in particulars from the get-go can prompt lopsided and unequal drawings.
3. Overlooking Extens
Ignoring the right extents can result in contorted and ridiculous portrayals. Use rules and reference points to guarantee that the components of your drawing are properly measured and situated. Extents are important to achieving a sensible and agreeable structure.
4. Forgetting to notice
Portraying from memory alone, without noticing genuine references or pictures, can restrict your capacity to catch precise subtleties and extents. Continuously find the opportunity to notice your subject cautiously, taking note of key highlights and their connections. Perception is critical for fostering a sharp eye for detail and precision.
5. Zeroing in on one region for a really long time
Focusing on one piece of your sketch for a really long time can prompt an unequal organization. It’s vital to deal with your sketch overall, slowly refining all regions. This approach keeps a strong and amicable drawing.
6. Utilizing some unacceptable instruments
Utilizing unseemly apparatuses, like bad-quality pencils or unacceptable paper, can obstruct your portrayal interaction. Put resources into great-quality materials, including a range of pencils (from hard to delicate), a solid sketchbook with the right paper surface, and dependable erasers. The right apparatuses can fundamentally further develop your outlining experience and results.
7. Being Hesitant to Commit Errors
A feeling of dread toward gaining slip-ups can smother innovativeness and headway. Embrace mistakes as a component of the growing experience. Each error gives us an amazing chance to improve and learn. Portraying is an expertise that is created after some time through training and trial and error.
8. Absence of Persistence
Anxiety can prompt surges and messy work. Take as much time as is needed to painstakingly design, notice, and execute your sketch. Tolerance considers better perception, more smart direction, and greater outcomes.
9. Disregarding Light and Shadow
Disregarding the significance of light and shadow can bring about level, two-layered drawings in your easy sketch for beginners. Consider the light source in your sketch and consolidate concealing methods to add profundity and aspect. Seeing light and shadow upgrades the authenticity and effect of your representations.
By staying away from these normal traps, you can further develop your fundamental outlining abilities, prompting more precise, adjusted, and expressive drawings.
FAQs
What are a few straightforward subjects to begin drawing?
Start with ordinary items like organic products, blossoms, and family things. These subjects are available and will assist you with rehearsing essential shapes and extents.
Do I want costly materials to begin portraying?
No, you don’t require costly materials. An essential arrangement of pencils, an eraser, and a decent-quality sketchbook are adequate for novices. As you progress, you can put resources into further-developed apparatuses.
How might I further develop my portrayal abilities?
Practice routinely, study from genuine references, and trial various procedures. Join workmanship networks, look for input, and gain from instructional exercises and informative books.
What is the most effective way to precisely draw?
Utilize light, essential shapes to frame your subject prior to adding subtleties. Focus on extents and use rules to assist with situating highlights accurately.
How might I keep away from normal errors in drawing?
Abstain from squeezing excessively hard with your pencil, overthinking subtleties too soon, and dismissing extents. Take as much time as necessary, notice your subject cautiously, and show restraint toward your advancement.
Would it be a good idea for me to utilize references for my portrayals?
Indeed, utilizing references assists you with figuring out extents, life structures, and subtleties. It likewise upgrades your perception abilities and gives motivation to your drawings.
How would I add profundity and aspect to my representations?
Consider the light source and use concealing procedures like incubating, cross-bringing, and mixing. This creates shadows and features, giving your sketch a three-layered appearance.
How would it be a good idea for me to respond in the event that I commit an error in my sketch?
Embrace botches as a feature of the educational experience. Utilize a massaged eraser to take off graphite delicately and right blunders. Botches give you significant illustrations and chances to work on your abilities.
Conclusion
All in all, investigating easy sketch for beginners as a novice is a superb approach to launching your creative excursion. By zeroing in on straightforward subjects and separating them into essential shapes, you can fabricate areas of strength for an in-drawing and foster trust in your capacities. Exploring different avenues regarding various materials, rehearsing routinely, and embracing botches as learning amazing open doors are fundamental stages to progress. Each sketch, regardless of how basic, adds to your development and comprehension of creative strategies. Keep in mind that the way to advance is through tolerance and constancy. Partake all the while, celebrate little accomplishments, and keep testing yourself with novel thoughts. With devotion and imagination, you’ll view outlining as a fulfilling and charming undertaking, opening ways to further develop creative pursuits later on.