

Introduction
To draw easy face skethch can be both inconvenient and fulfilling, uncovering the complexities of human demeanor and life structures. Whether you’re a youthful adult or hoping to refine your abilities, mastering the vagabond pieces is key.Begin by making sense of facial degrees, confining the face into unclear thirds for the safe space, nose, and jaw to remain mindful of concordance. Eyes ought to sit routinely down the head, while the mouth consistently lines up with the students.Practice consistently and use references to help with precision as well. Examine different streets with respect to various styles and methods to cultivate your amazingly inventive voice. Drawing faces offers tremendous doorways for the innovative psyche, from getting ends to depicting character attributes.
Material required to draw faces:
Easy face skethch requires explicit materials to accomplish detail, profundity, and authenticity. Also read How to draw Easy Sketch of Lion. Here is an exhaustive rundown of the fundamental materials and devices you’ll require:
1. Drawing Paper
- Quality: Utilize smooth, heavyweight paper (around 100–140 lb. or 160–250 gsm.) to forestall wrinkling and take into consideration eradicating and mixing.
- Types: Pick between sketch cushions, drawing cushions, or individual sheets in view of your inclination and venture size.
2. Pencils
- Graphite Pencils: A bunch of graphite pencils (HB, 2B, 4B, 6B) for changing line loads and concealing. HB for light layouts and subtleties; gentler grades for hazier tones and concealing.
- Mechanical Pencils: discretionary for exact subtleties.

3. Eraser
- Worked Eraser: Moldable and delicate, ideal for lifting graphite without harming the paper.
- Vinyl Eraser: For more exact deleting of little subtleties.
4. Mixing Devices
- Mixing Stumps/Tortillons: Moved paper sticks are used to mix graphite and make smooth advances.
- Tissue Paper: delicately rub for unpretentious mixing impacts.
5. Drawing Pens
- Fine Liners: waterproof pens in different thicknesses (0.1mm to 0.5mm) for framing and adding subtleties.
- Brush Pens: discretionary for adding ink washes or strong strokes.
6. Charcoal and Pastels (Discretionary)
- Charcoal Pencils/Sticks: For rich, profound overshadowing and expressive strokes.
- Delicate Pastels: Fine sticks for energetic tones and delicate mixing, valuable for adding variety accents or foundations.
7. Ruler and Compass
- Ruler: For estimating extents and straight lines.
- Compass: discretionary for exact circles or circular segment frames (e.g., eyes).
8. Planning phase
- The planning phase, or ease, gives a steady surface to drawing, which is particularly helpful for larger craftsmanship.
9. Reference Photographs or Models
- Photos: Excellent pictures of appearances for precise perception of elements, lighting, and shadows.
- Mirrors: for self-representations or concentrating on looks continuously.
10. Lighting
- Regular Light: Great for exact variety, insight, and shadow definition.
- Work area Light: a customizable light hotspot for steady lighting conditions, particularly valuable for indoor drawing meetings.
11. Fixative (discretionary)
- Splash Fixative: Forestalls smirching and gets graphite or charcoal drawings. Use in a very well-ventilated region.
Ways to pick materials:
- Quality versus financial plan: Put resources into great-quality materials that are affordable for you to guarantee improved results and solidity.
- Explore: Attempt various brands and sorts of pencils, paper, and erasers to find what turns out best for your style and strategy.
- Capacity: Keep pencils sharp and erasers clean to keep up with accuracy and abstain from smirching.
- Climate: Work in a sufficiently bright and agreeable space to upgrade focus and imagination.
- A face expects to notice detail and persistence, so having the right materials guarantees you can catch demeanors and subtleties successfully. Exploring different avenues regarding various apparatuses and methods will assist you with fostering your imaginative abilities and making drawings into pictures.
Step by Step guidance
DRAW ALONGSIDE ME NOW. AND TEACH YOURSELF TO DRAW THE FACE AND FACIAL FEATURES OF WOMEN.Let’s now get going.
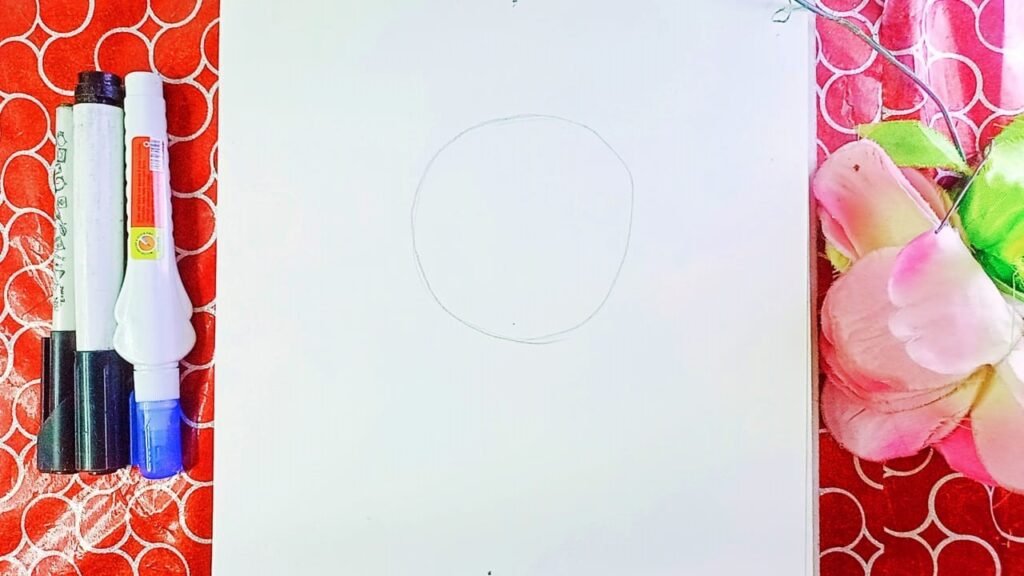
Step#1:
The accompanying step is to draw a circle easy face skethch . In the event that you can’t make a circle appropriately, it doesn’t make any difference . However long you try, you can.
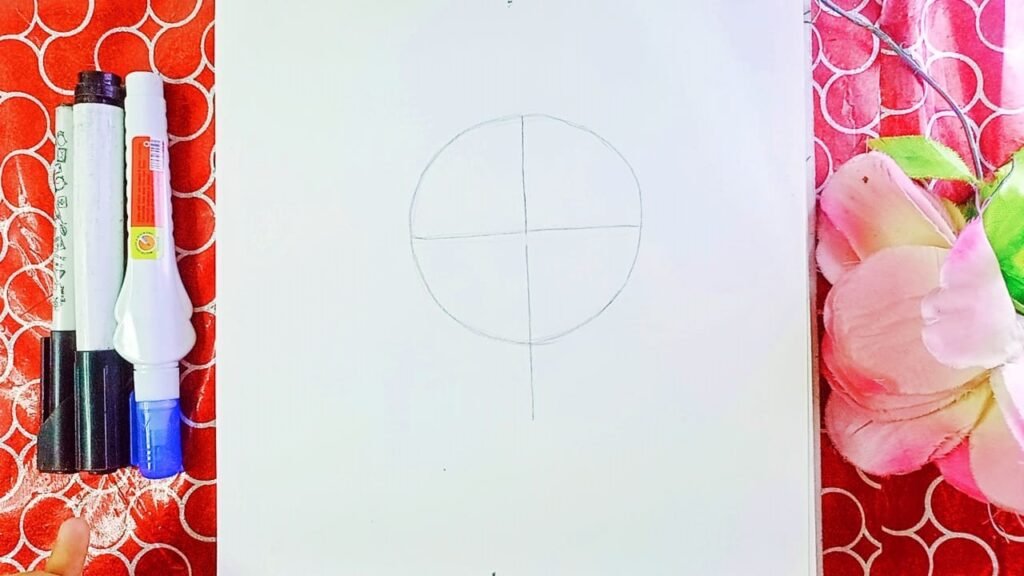
Step#2:
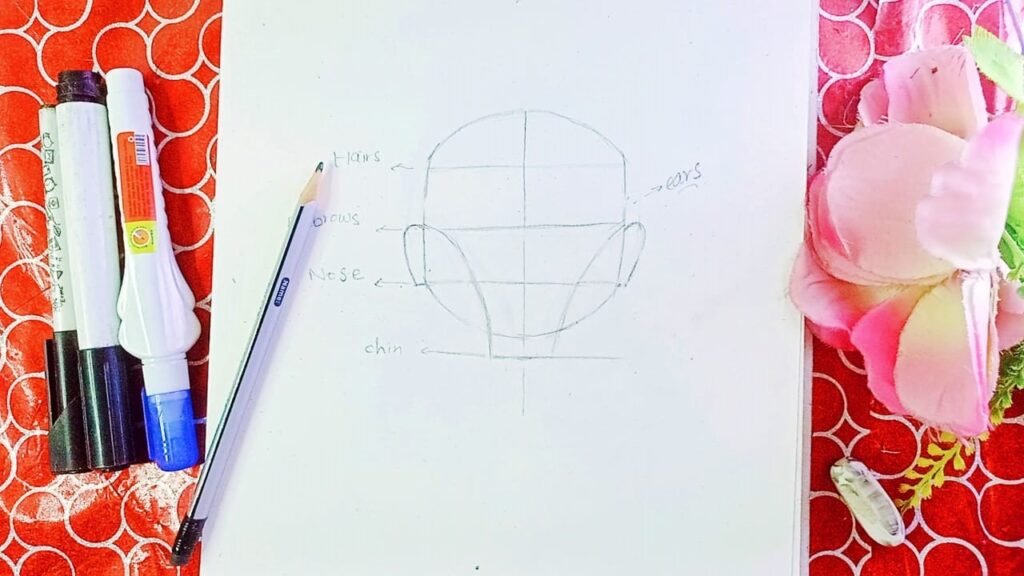
Cut the circle in this step, utilizing straight lines both on a level plane and in an upward direction. To draw easy face skethch The eyebrows’ rule is addressed by the flat line.
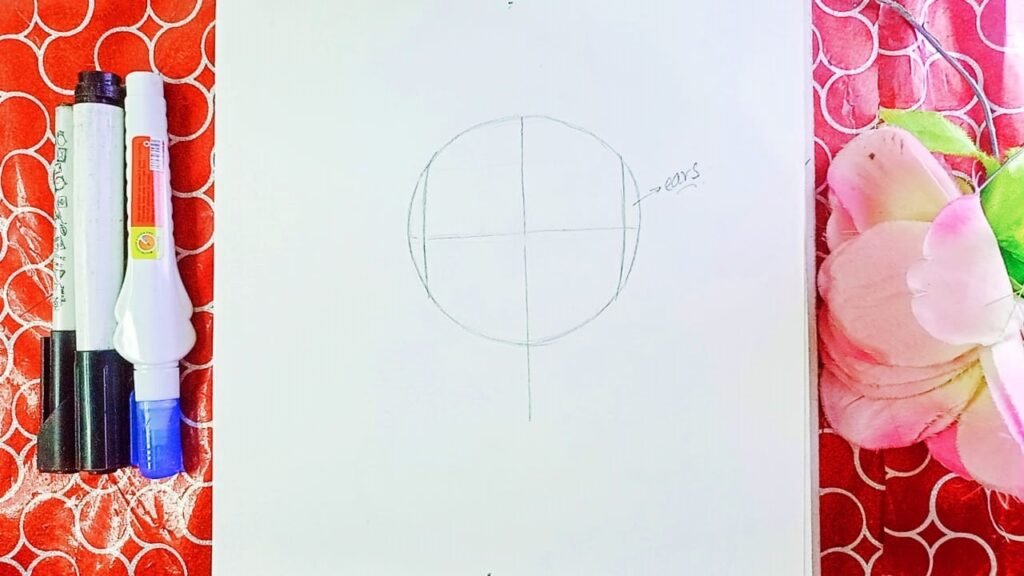
Step#3:
In this step, cut the circle’s small cuts from the left and right sides in your easy face skethch . It is the district on the face where the ears are drawn.
Step#4:
I denoted the circle with three lines of equivalent length. The reality of the nose is the third line from the top, trailed constantly, and the third line for the eyebrows. Moreover, add a different line to the lower part of the whole circle in your easy face skethch . It is the jawline line.

Step#5:
In this step of your easy face skethch , draw ears under the bended lines.

Step#6:
Alongside a bended jawline line and eyebrow line, draw cheekbone lines in easy face skethch .
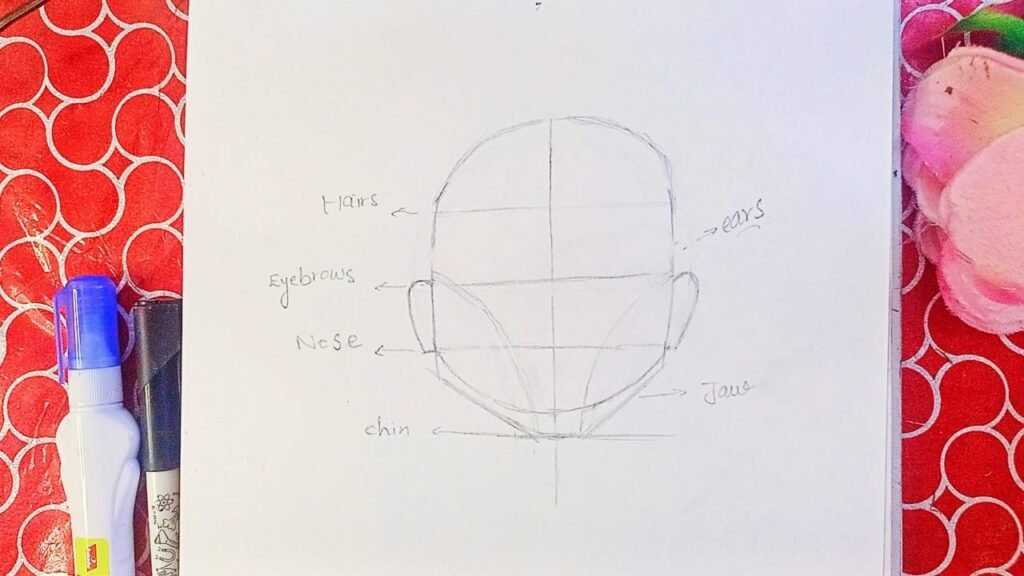
Step#7:
On the face, draw the jaw. It is illustrated by the jawline lines on the upper side of your easy face skethch .
Step#8:
On the temple rules, draw eyebrows.
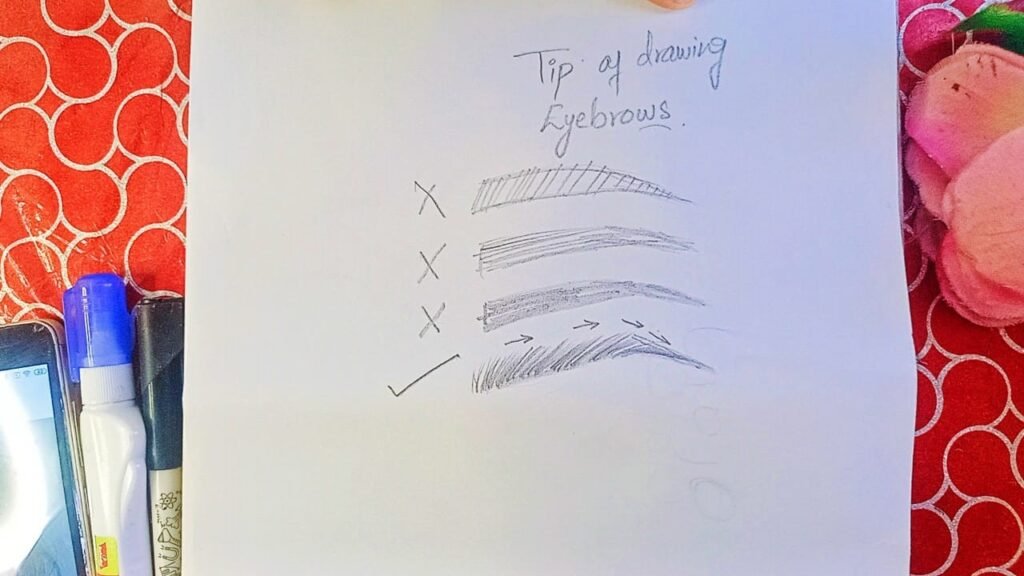
Eyebrow concealing tips:
- A straight line can’t be utilized to conceal the temples. since it looks wired and ugly in your easy face skethch .
- It looks off-kilter to conceal the foreheads with flat lines.
- Continuously start drawing stroke lines by defining straight boundaries. Furthermore, gradually twist it toward your eyebrows. As displayed in the outline, in the event that you are drawing an eyebrow on the right side, you can twist the strokes into the right side, and on the off chance that you are drawing one on the left, you can twist them into the right side.
Step#9:
Scowl with an eye. The distance between the two eyes is likewise equivalent. With the third eye in the image, I can see it. You can tap the connection beneath to advance with the eye inside and out.Making eyes

Step#10:
Little, bended lines ought to be utilized to address the eyes’ upper and lower eyelids. As found in the representation, draw the eyes’ eyelids.
The Correct Method for Drawing Eyes
- There is a slip-up that novices regularly commit. It will tell you the best way to fix this mistake.
- New specialists generally draw like this. They are accurately portrayed as bended lines. The greatest mistake has been made.
- • Continuously draw a bend line with the middle point toward the end and the beginning stage toward the start.
- In these representations, I portray how to take a gander at eyes accurately and erroneously. Take a gander at these photos and attempt to get a handle on what I’m talking about.

Step#11:
Make a nose by estimating the space between the two eyebrows and drawing it there. As displayed in the representation, draw the nose frame.

Step#12:
Define the mouth’s boundary utilizing the circle’s base side.

Step#13:
Involving the mouth’s midline as an aide, draw the top and base lips.

Step#14:
The consummation of our female face is accomplished by masterfully stressing the facial lines.

Tips for an amazing face sketch:
Making an ideal face sketch requires both specialized abilities and imaginative understanding. Here are a few hints to assist you with accomplishing an exact and expressive representation:
Concentrate on facial extents
- Partition the Face: Comprehend essential extents by separating the face into equivalent thirds in an upward direction for the temple, nose, and jaw. Evenly, the eyes generally sit mostly down the head.
- Estimations: Utilize light lines to stamp central issues (e.g., hairline, forehead line, nose base, jaw) prior to adding subtleties. This keeps up with evenness and equilibrium.
2. Begin with Fundamental Shapes
- Frame Highlights: Start with basic shapes (circles for the eyes, triangles for the nose, and ovals for the mouth) to lay out the situation and size of facial elements.
- Light Sketch: Utilize a light touch with your pencil to make introductory frameworks and abstain from squeezing excessively hard, taking into consideration changes later.
3. Center around the eyes, nose, and mouth.
- Eyes: Cause eyes practically by paying attention to shape, size, and arrangement. Incorporate subtleties like eyelashes, iris features, and reflections for profundity and articulation.
- Nose: Characterize the scaffold, nostrils, and tip with unpretentious overshadowing and mixing to make shapes.
- Mouth: Catch the shape and articulation of lips with light strokes, taking into account bends and shadows to portray volume and surface.
4. Dominating Overshadowing and Surfaces
- Light and Shadow: Notice light sources to figure out where shadows fall normally. Utilize differing strains with your pencil (delicate for lighter regions, harder for shadows) to create profundity and aspect.
- Progressive Mixing: Use mixing devices like tortillons or tissue paper to relax advances among light and shadow, staying away from cruel lines.
5. Catch Looks
- Eyes and Eyebrows: Change eyebrow points and eye shapes to convey feelings. Little changes in the eyebrow curve or eye shape can emphatically adjust the look.
- Mouth and Facial Structure: Characterize facial structure and cheekbones with inconspicuous concealing to improve facial design and convey state of mind.
6. Itemizing and refining
- Hair and Ears: Focus on the hair surface and stream, involving light strokes and layers for authenticity. Incorporate ears that are relatively lined up with the eyes and nose.
- Beard growth and skin surface: For male pictures, think about stubble or facial hair surface. For female pictures, portray skin surfaces and cosmetics softly.
7. Practice routinely
- Sketch from Life: Work on drawing faces from genuine perception to further develop exactness and catch normal demeanors.
- Use References: Allude to photos or works of art for motivation and direction on extents, lighting, and subtleties.
8. Tolerance and Diligence
- Enjoy Reprieves: Step back intermittently to survey your work in good ways. This distinguishes regions requiring change.
- Analyze: Investigate various strategies, like cross-incubating for surfaces or involving various grades of pencils for concealing.
Making an ideal face sketch requires persistence, perception, and practice. Each sketch is a mastering an open door to refine your abilities in catching human life systems and articulation. Explore different avenues regarding various strategies and feel free to commit errors; they are fundamental for your development as a craftsman. Partake during the time spent rejuvenating faces on paper!
What to keep away from during face draws
While outlining a face, certain entanglements can reduce the practical and expressive representation. Here are some key things to keep away from:
1.Exhausting the paper
Squeezing Excessively Hard: Keep away from awkward strokes that indent the paper. Utilize light, sensitive lines at first to take into account changes and revisions.
2. Balance Fixation
Wonderful Evenness: Human countenances are seldom entirely balanced. Embrace slight imbalances to make a more regular and sensible representation.
3. Disregarding Extents
Mistaken Extents: Focus on the size and situation of facial highlights relative to one another. Measure and contrast distances between central issues to keep up with exactness.
4. Absence of Profundity
Level Elements: Use concealing and features to create profundity and aspect. Abstain from leaving highlights looking level and two-layered.
5. Excessively Cruel Lines
Cruel Layouts: Rather than framing highlights with brutal lines, utilize unpretentious overshadowing and slow advances to characterize shapes and forms.
6. Conflicting lighting
Conflicting Light Source: Settle on a light source and stick to it all through the sketch. Conflicting lighting can befuddle shadows and features.
7. Disregarding Facial Design
Disregarding Bone Design: Figure out facial life structures, including cheekbones, facial structure, and temple bones. These designs impact the general shape and presence of the face.
8. Skipping Subtleties
Missing Facial Subtleties: Incorporate little subtleties like eyelashes, skin surface, and unpretentious kinks (if material) to add authenticity and character to the picture.
9. Hurrying the Cycle
Restlessness: Take as much time as necessary with each phase of the sketch. Surging can prompt errors and a less refined eventual outcome
10. Duplicating Without Understanding
Indiscriminately Duplicating: While at the same time utilizing references is beneficial, comprehend the standards behind the thing you’re drawing. This guarantees you catch the essence instead of just duplicating a photo.
11. Overlooking Look
Dead Articulation: Focus on the eyes, eyebrows, and mouth to convey feelings and catch the subject’s character. An absence of articulation can cause the picture to show up level.
FAQs
1. What are the fundamental extents to remember while drawing a face?
It is urgent to a fundamental extent. Partition the face into three equivalent parts upward for the brow, nose, and jaw. Evenly, the eyes commonly sit mostly down the head. These rules assist with keeping up with equilibrium and authenticity in your representations.
2. How might I work on my precision in catching facial elements?
Work on noticing and outlining genuine models or photos. Focus on the novel shapes and forms of elements like eyes, noses, mouths, and ears. Utilize light rules and estimations to guarantee extents are exact.
3. What drawing materials are fundamental for outlining faces?
Fundamental materials incorporate quality drawing paper (smooth and heavyweight), graphite pencils (different grades for concealing), erasers (massaged and vinyl), and mixing instruments (like tortillons or tissue). Discretionary materials might incorporate charcoal, pastels, and fine liners for specifying.
4. How would I pick the right lighting for drawing faces?
Normal light is great for exact variety, insight, and shadow definition. If inside, utilize a reliable light source like a work area light to limit shadows and, in any event, create lighting across your drawing surface.
5. What are a few normal mistakes to keep away from while drawing faces?
Abstain from workaholic behavior on the paper, fixating on wonderful evenness, ignoring facial construction, utilizing cruel lines, and hurrying the interaction. Likewise, be aware of conflicting lighting, skipping subtleties, and indiscriminately replicating without understanding.
6. How might I convey reasonable appearances right in front of me?
To catch feelings, center around unobtrusive changes in eyebrow point, eye shape, and mouth curve. These subtleties assume a critical role in conveying temperament and character in your representations.
7. Would it be a good idea for me to utilize references while drawing faces?
Indeed, utilizing references, for example, photos or genuine models, is exceptionally valuable. They give direction on extents, highlights, lighting, and articulations. Be that as it may, endeavor to comprehend the standards behind the thing you’re drawing instead of just replicating.
8. How might I foster my own style of drawing faces?
Fostering a one-of-a kind style includes trying different things with various procedures, mediums, and understandings. Practice consistently, investigate different styles (reasonable, adapted, and expressive), and permit your own inclinations and imaginative impulses to direct your innovative strategy.
Conclusion
In light of everything, prevailing at drawing a face requires both explicit dominance and creative responsiveness in your easy face skethch . By figuring out facial degrees, shining on light and shadow, and getting straightforward subtleties, you can make pictures that are relative and expressive.
Typical practice, perceptions from life, and trial and error with various strategies will assist you with refining your capacities and empowering your own unprecedented style. Whether you’re portraying for satisfaction or seeking a work of craftsmanship, drawing faces offers gigantic entrances for imaginative psyche and self-demeanor. Partake in the time spent moving forward with your abilities and restoring your appearance on paper. With commitment and energy, every depiction you prompt will convey a feeling and recount a story, giving the substance of your subject legitimacy and importance.